THE ART ESCAPE
  • Home
  • About
  • Artwork
    • Book Page Art
    • Custom Portraits
  • Find Me
  • Order
  • Classes
Picture

T-Shirt Tote Bag

3/23/2020

0 Comments

 
Picture
With this crazy Coronavirus lockdown I've been going through and cleaning things like crazy! This includes my lovely art room where I often shove things in corners and add it to my mental "to-do" list yet they continue to sit there for months on end. Well, this is the perfect time to get these projects done!

I had an old t-shirt of my Papaw's that I had tye-dyed with my Grandma. I have 2 so I thought it'd be cool to actually make something with one of them. I thought this would be a great opportunity to share with you all a perfect quick project that can be done with any age!

This would be great for all those kiddos at home if you need something to fill up some time! Have your kiddos pick out an old shirt they no longer like to wear or if you have adult sized shirts that would be even better (ya know, more room for all the stuffs!). 
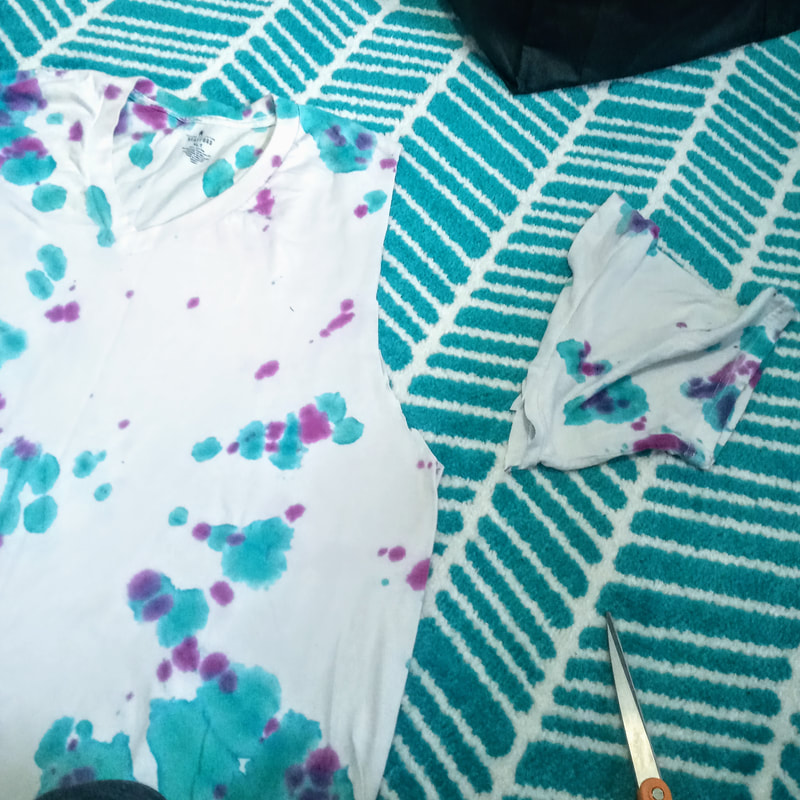
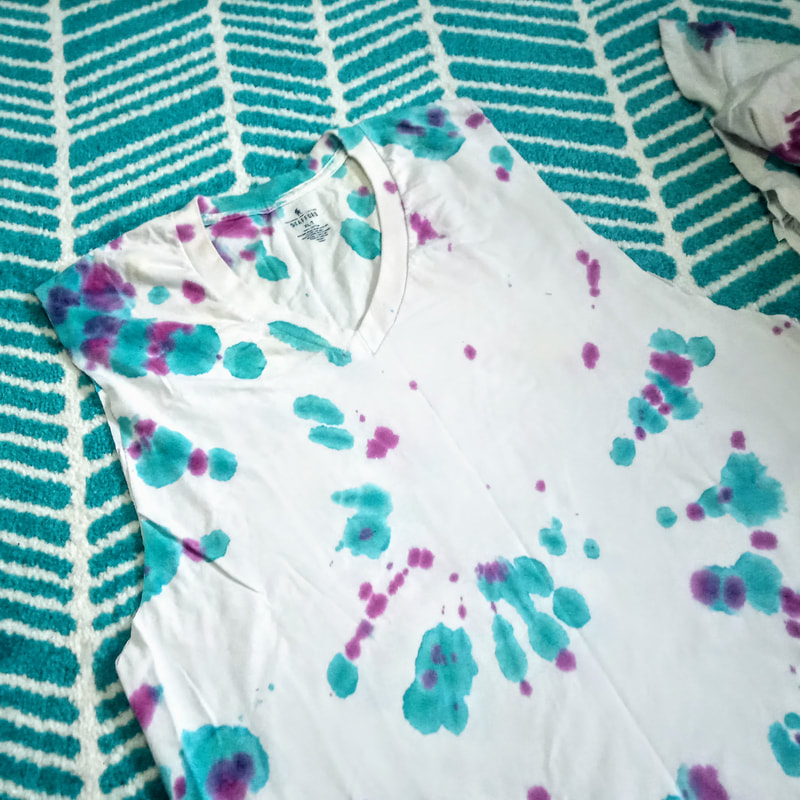
Supplies:
-Old t-shirt (the bigger the better unless you have itty bitties doing this project!)
-Good pair of scissors 
(that's it, crazy!)
1. Lay your t-shirt on the floor or a flat surface (actually make sure it's laid out evenly unlike me!)
Picture
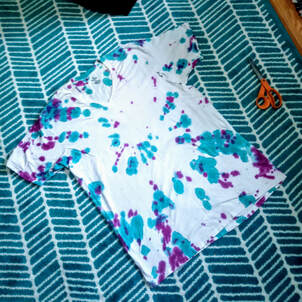
2. Cut off the sleeves of your shirt in a half U-shape (you're creating the handles of the bag with this step). You can draw this out if you prefer but I just went ahead and cut away!
Picture
Picture
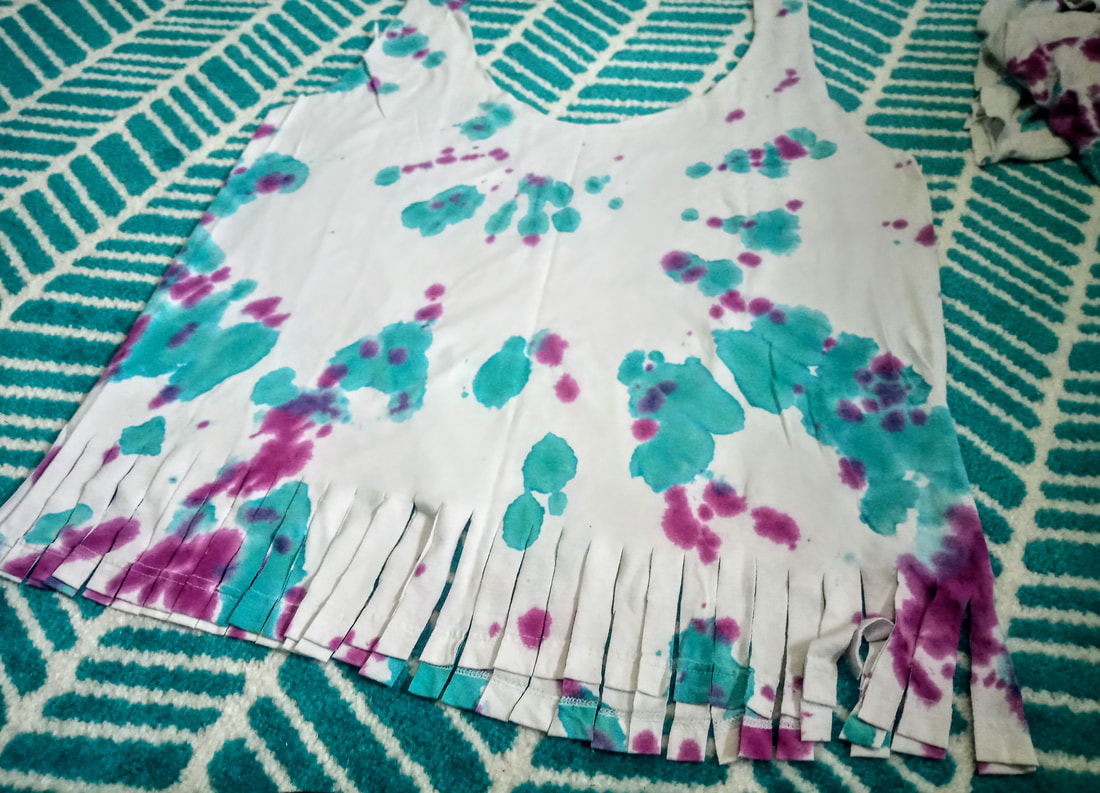
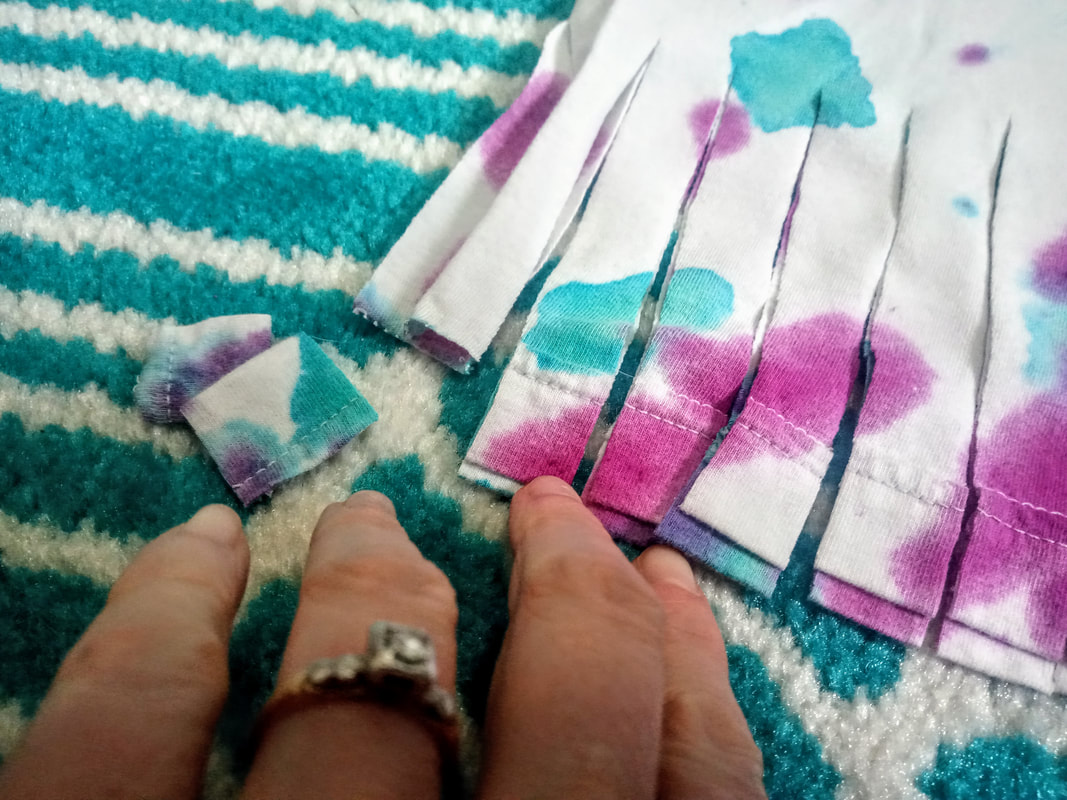
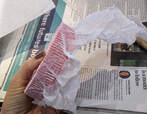
3. Next, cut the neckline into a complete U-shape (you are creating the bag opening here).
Picture
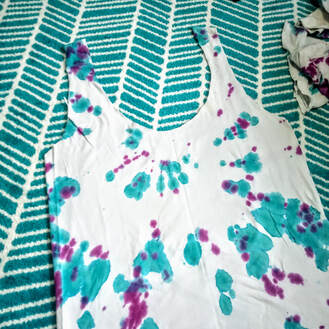
4. Next, cut "fringe" strips at the bottom of the shirt (exactly like you were making a fleece tie blanket!). You are cutting through both the front and back layers here. Note: I should have cut off the hem strip on the bottom of the shirt because I, personally, do not like that extra chunk of fabric. I ended up having to cut this off each piece afterwards! 
Picture
Picture
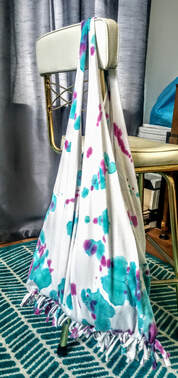
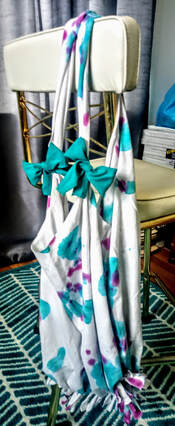
5. Tie the front and back fringes together in a knot and continue all the way across the bottom of the shirt.
Picture
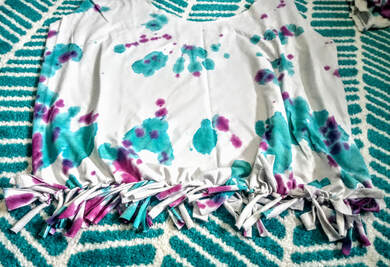
6. And just like that, you have a new tote bag! ...But let me show you the cool thing about this bag... 

If you're into the hippie vibe and dig those fringes, you can totally rock it that way! BUT, if fringe just ain't your thing then go ahead and flip the whole bag inside out! Those fringes will be hidden on the inside and no one will know! Check it...

Note: you can even add some embellishments like these cute bows made out of scrap fabric! 
Picture
Picture
Picture
0 Comments

Fairy Lantern PB Jar

10/10/2019

0 Comments

 
Picture
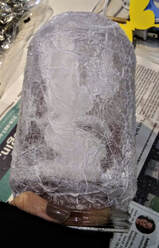
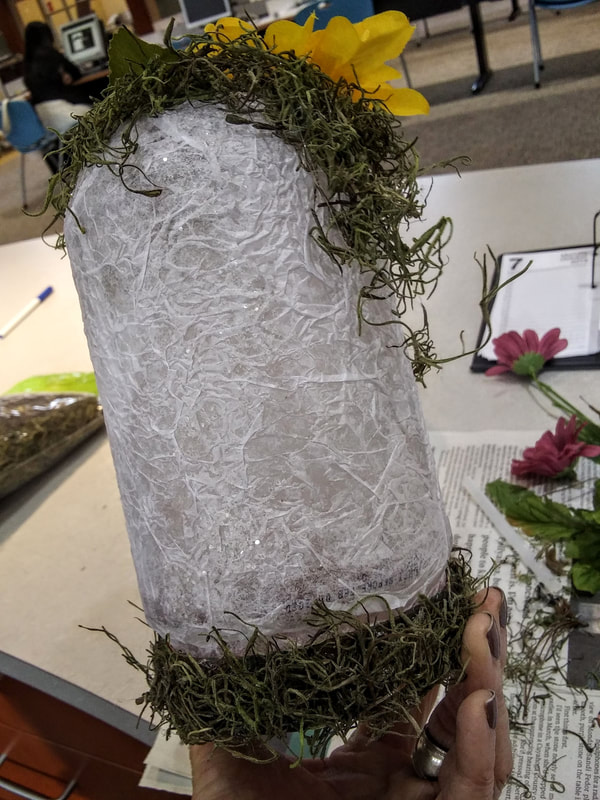
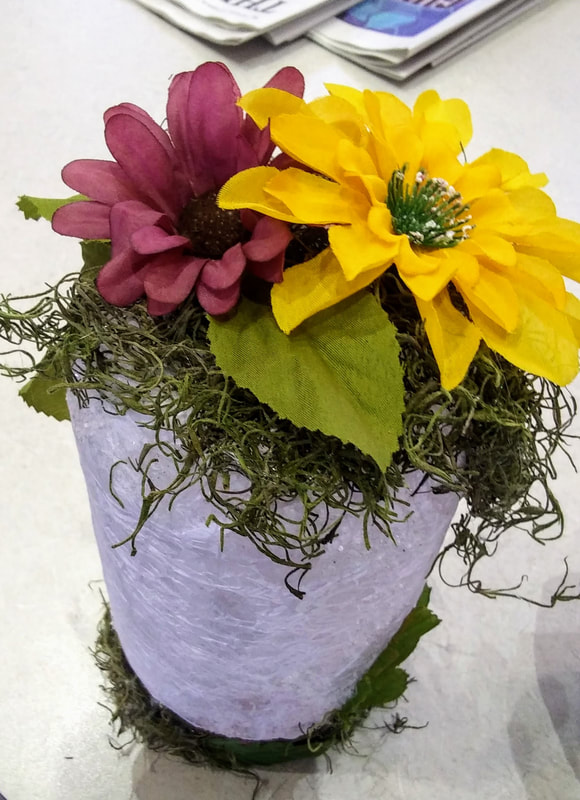
I've done this fairy lantern craft before with glass jars and people loved it! They couldn't wait to take it home, show it off, and replicate it with kids/grandkids/friends. I left that night feeling really great about the program and that I helped people create something they fell in love with.

Time for some self-shaming. David, my boyfriend, and I eat a tonnnnn of peanut butter. Like, a tonnnnn, probably way more than we should to be honest. We've actually recently cut down on it but, boy oh boy, do we love us some PB.

On that note, I was getting anxiety over using up so many plastic containers. There had to be something I could use them for! With no plan in mind, I started soaking them, washing them, and de-labeling them meticulously one at a time with no purpose at the end of the tunnel.

Then, the fairy lanterns came into mind. I had done it before with glass and thought, well, why not give it a try... I have plenty more to use if it doesn't work! I gotta say it turned out pretty darn cute. I think it's decently disguised but if I were doing it for myself, or for a gift, I think I would choose to add a lot more moss and other items to disguise it even more. Anywho, the instructions are as follows, happy crafting! 
Supplies:
  • Peanut Butter Jar washed and de-labeled 
  • Tissue paper (I used white but I want to try pastels next)
  • Cut out fairy or other silhouette on thick paper
  • Mod Podge
  • Foam Brush
  • Glitter
  • Hot Glue Gun
  • Moss
  • Flowers
  • Paint - green, brown, black
  • Tape
  • Battery operated tealight
1. I used a half sheet of tissue paper to cover up the PB jar. Tear your piece off and crinkle it up into a ball. Coat a large area of your PB jar with Mod Podge using the foam brush. Carefully, unravel your tissue paper and lightly lay it into the glue. You don't want to flatten it out completely because you want the crinkle to stay in the paper. Continue to do this so the entire jar is covered in tissue paper. 
Picture
2. Cut or tear the rest of the tissue paper to get rid of any overlap. Keep in mind, to have this area at the back of your lantern so that you cannot see the "seam line".  
Picture
3. The bottom of your jar will become the top. Mod Podge the bottom and fold over the tissue paper at the end to cover this entire area. 
Picture
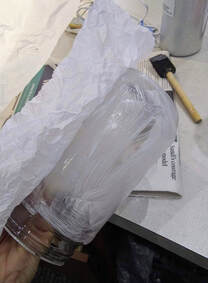
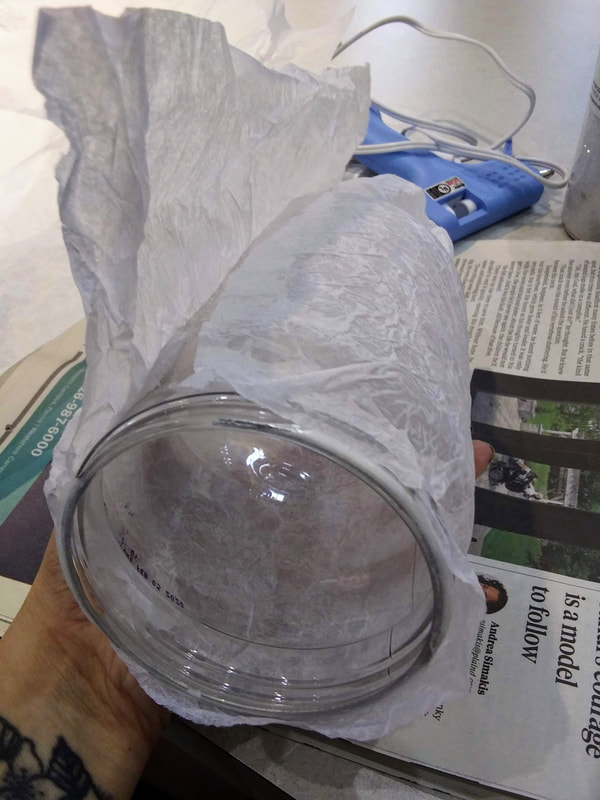
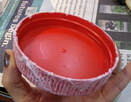
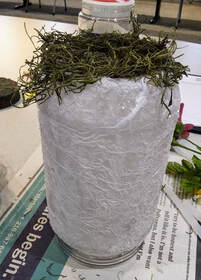
Note: I did not cover the entire lip of the jar so that it can still be twisted shut if desired.
Picture
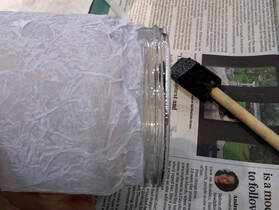
4. Next, I did the same thing with the lid of the jar. I knew I wanted to paint it and glue items to it so I thought covering it with tissue paper would create a nice textured layer for this purpose. 
Picture
Picture
Picture
Note: I did not cover the inside of the lid and afterwards, I wish I had. I can, of course, do this at any time but I wanted to point this out. I feel if you do not cover the inside, you can see the red of the lid on the outside. It isn't super noticeable, but I notice it. 
Picture
5. While the lid is drying, I added my fairy on the inside of the jar. I adhered her with two pieces of rolled tape, one on her legs, and one on her wings. This is better than gluing her completely down. It creates a more natural shadow effect when the lantern is lit up at night!
6. Now that I know where my fairy is sitting, I added glitter to the outside of the jar. I didn't cover the entire thing, just enough to form a frame around where the fairy rests. I used a translucent glitter for this, brushing on Modpodge, then lightly adding the glitter. As the glitter dries, I tap it so that it sets into the glue more. 
Picture
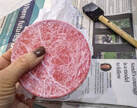
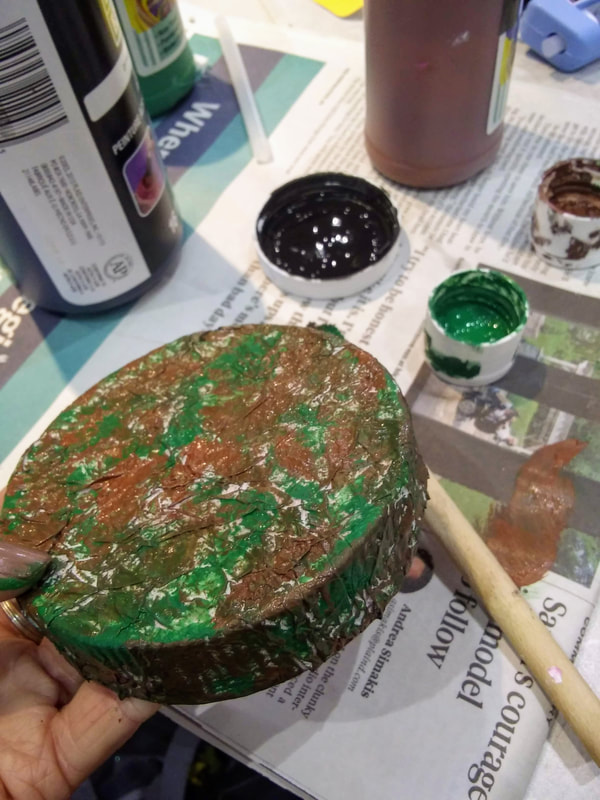
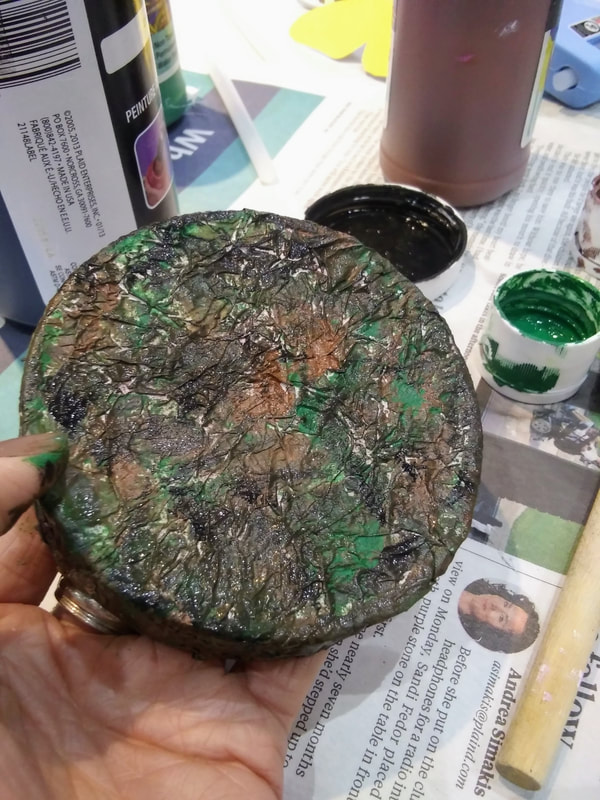
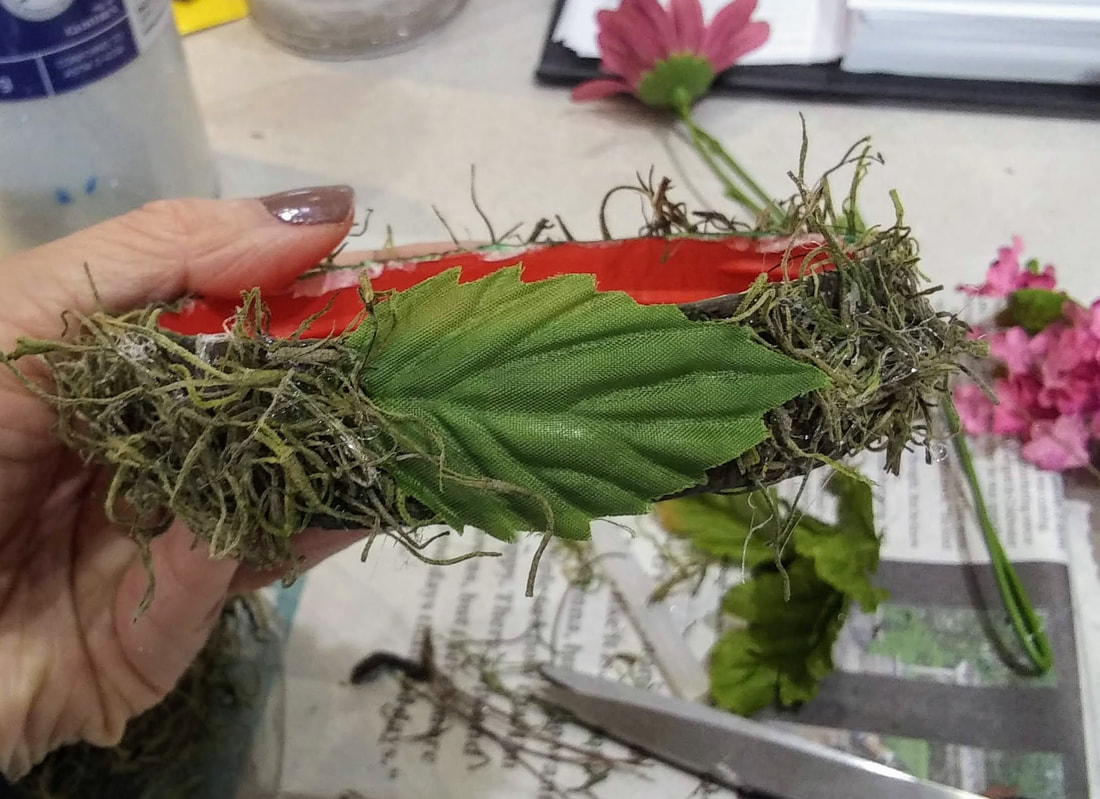
7. Here is where I painted my lid to camouflage it. I knew I would be adding moss later, but I didn't want any of the white tissue paper coming through! I sponged on a layer of green, then brown, then black with the foam brush, just enough to cover most of the white. 
Picture
Picture
Picture
8. For the fun part! I used moss for a more stereotypical fairy lantern look and I am very glad I chose to do so. First, I added moss to the top of the jar. To do this, add a bit of hot glue, and tap in some moss. Careful with your fingers! This is high-finger-burning-time! Keep adding the glue and moss until you feel satisfied with the amount. I wanted to add enough to disguise the shape of the PB jar. 
Picture
Picture
9. Next, add some flowers, leaves, whatever you'd like to dress up the top! 
10. I did the same exact thing with the lid and even added a leaf here as well.  
Picture
Picture
Picture
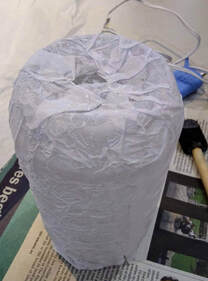
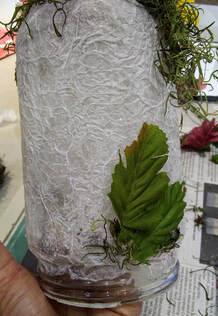
Note: I wanted to point out that I noticed the expiration date and other numbers was printed on the plastic and was totally showing through the tissue paper! Eww! I covered this up with yet another leaf and some more moss. 
Picture
11. The last step is to add your battery operated candle! I purchased mine on Amazon. I chose a tea light that was a little taller than the typical light to accommodate the height on the lip of the jar.

​
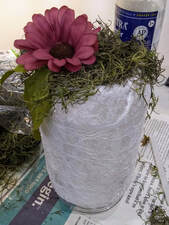
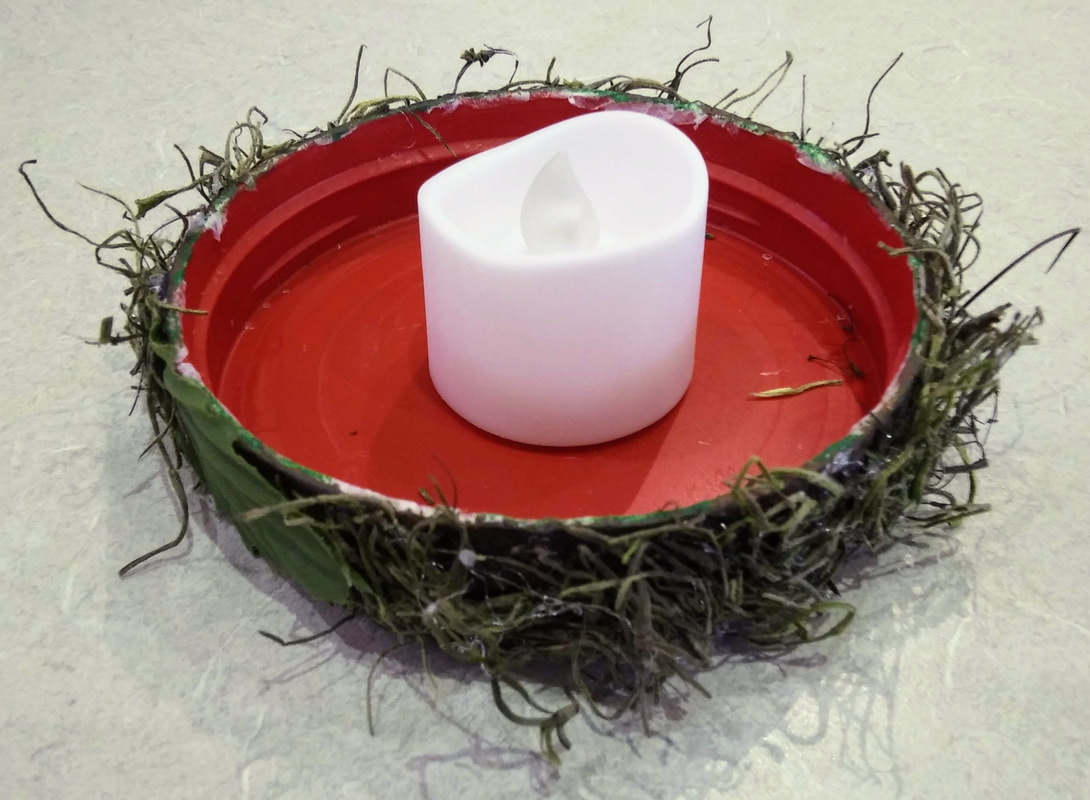
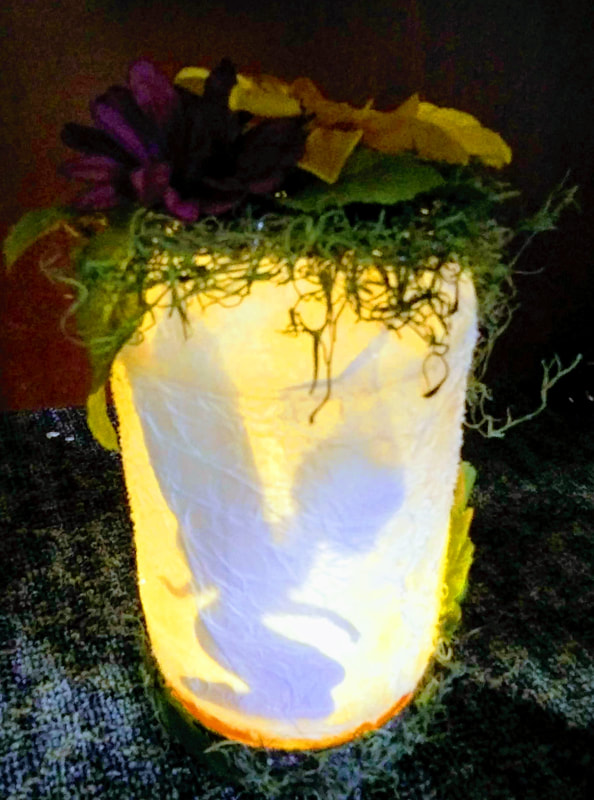
​Turn that beauty on and look at her glow!
Picture
Picture
Were using the PB Jar method at work for a mother-daughter craft program. This makes it even better that we are using plastic jars instead of glass in case we have any little ones attend! We are also including in the description that these are actually Peanut Butter jars and that if you have a peanut allergy we do not recommend attending just in case any residue is leftover. 

​Let me know if you have any questions!
0 Comments

American Flag Tapestry

3/4/2019

0 Comments

 
Picture
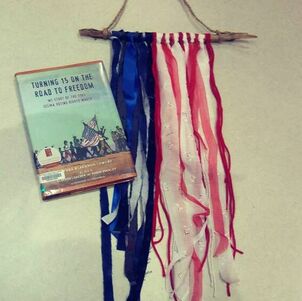
I created this quick craft project to tie into a book discussion at work. But this so easy, anyone can do it and it's very quick as long as you are making a smaller size. I also think this would be awesome in an extra large size as well!

Supplies:
  • Base form (I used a piece of driftwood!)
  • Twine 
  • Yarn
  • Ribbons
  • Fabric

1. Gather your supplies all in one space so you are ready to go!
       a. If you are using fabric, I would cut your strips at this time as well

2. Use blue pieces to represent the blue star part of the flag (I saw some online that used white beads throughout to represent the stars!) and alternate your red and white for the stripes. 

3. Tie your strips on using the Larkshead Knot technique below. This is a great way to add your elements because you get two components out of one. 
       a. You can also tie them however you wish. Try tying little pieces together of different types/textures to give your flag more variety. 
Picture
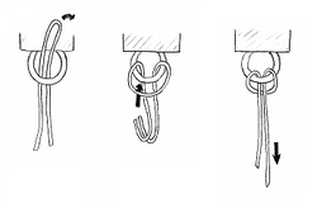
​4. Create a piece for hanging. I did this by wrapping 3 pieces of twine around the one end, braiding it, and tying it off on the other side. 

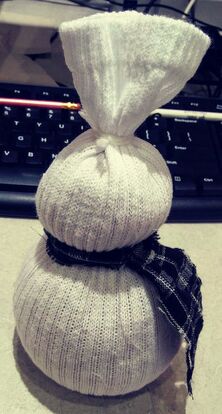
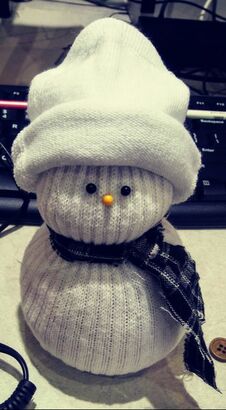
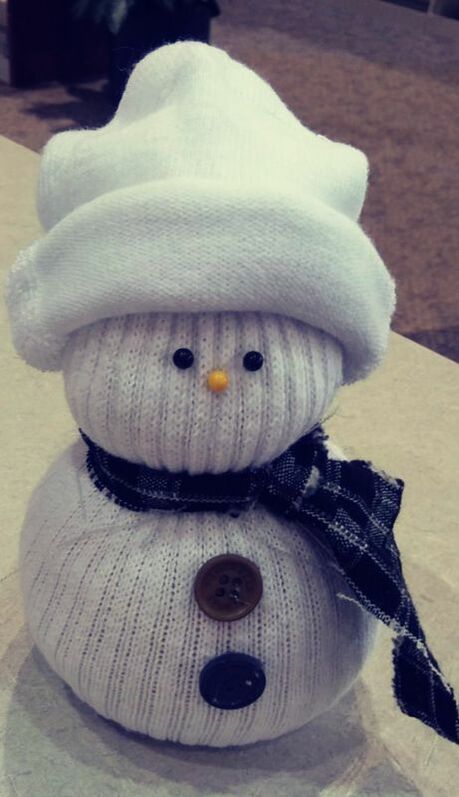
5. That's it! Feel free to add whatever types of elements you have lying around! Perfect decoration for the most rustic folks you know!
0 Comments

Sock Snowman

1/12/2019

0 Comments

 
Picture
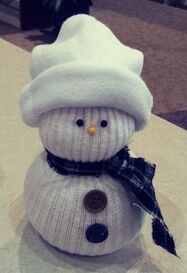
This little guy, or gal, is a super easy craft for young and old alike! Great for a chilly winter day to take up some down time and occupy little ones. 

Supplies:
  • Mid-crew or crew sock
    • without text, if possible
  • Yarn or rubber bands
  • Scissors
  • Rice
  • Embellishments
    • (sewing pins, buttons, markers, gems, scrap fabric etc.)
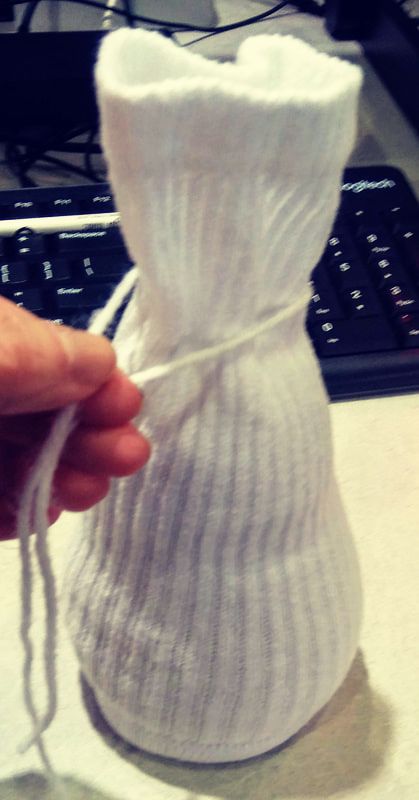
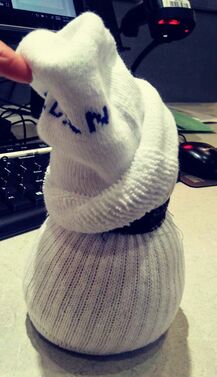
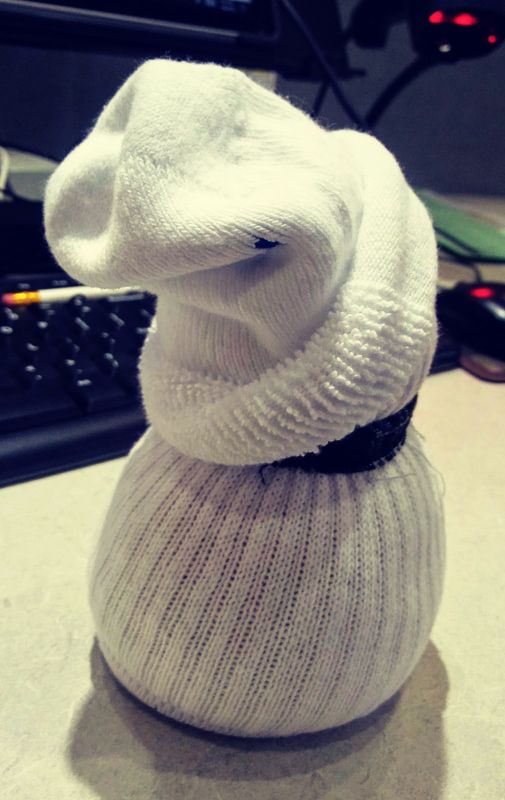
1. Cut your sock in half at the location in the photo
Picture
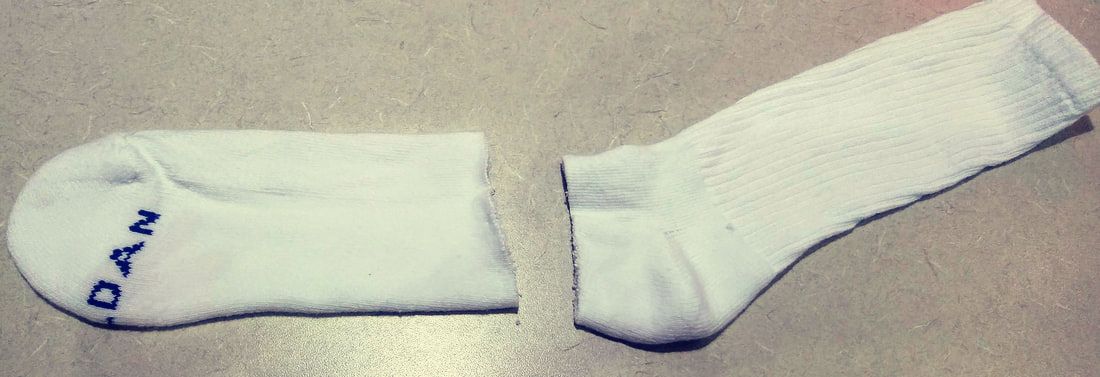
2. Take the top half and turn it inside out
Picture
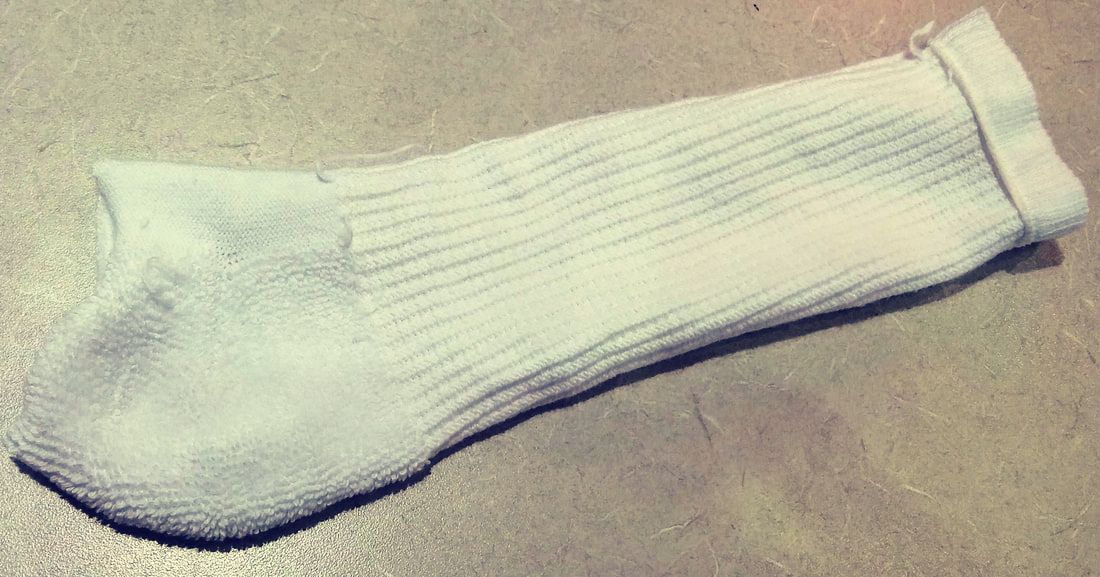
3. Tie off the cut end with string (make sure to tie it tight!) and flip it back right side out
Picture
Picture
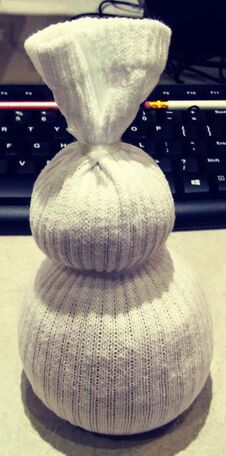
4. Start filling your sock with the rice (a funnel will help make it easier or just take your time with pouring) Fill the sock as much as you’d like – there is no right or wrong way
Picture
5. When the sock is as full as you’d like, tie it securely at the top with string or rubber bands
Picture
6. Create the “head” by tying string tightly around the second area
Picture
7. Start embellishing – add a piece of scrap fabric to look like a scarf
Picture
8. Use the toe part of your sock to create the hat by rolling it up from the cut side
Picture
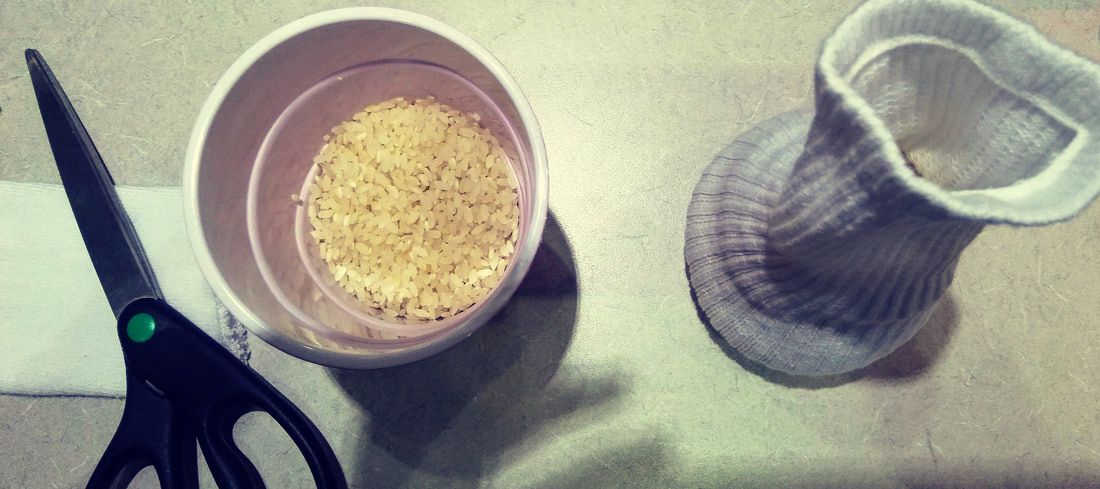
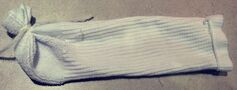
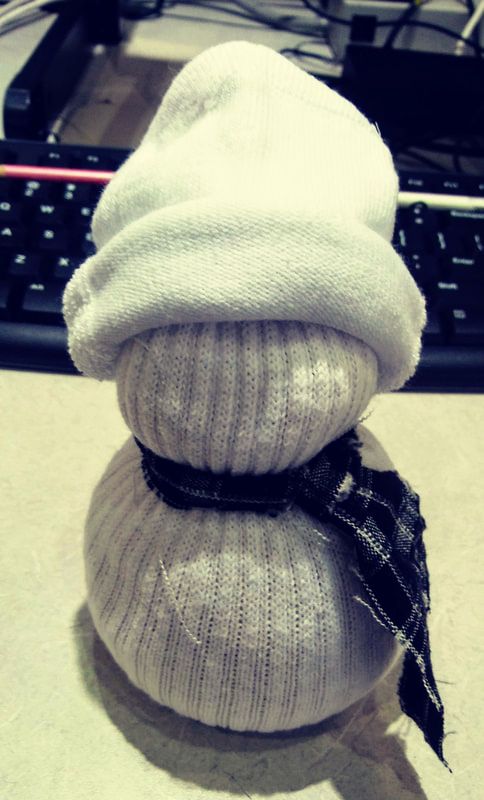
*I wanted to mention here, if you have text on your sock, it may show on the hat. I, luckily, covered mine up by folding the hat over "hipster" style as shown below.
Picture
Picture
9. Create a simple face using sewing pins or with a marker
10. Add some buttons if desired and your little guy or gal is all set!
Picture
Picture
​https://winkgo.com/diy-white-sock-snowman/
0 Comments
    Picture

    Rebecca Myers 

    Hey there, I'm Becca, or Rebecca, but not Becky, never Becky, unless you're my family from down south! I'm a simply modern librarian by day and an artist by night. My pursuit is for a simple, happy, healthy, and more fulfilling life! I hope I inspire you to get crafty!

    Archives

    March 2022
    February 2022
    January 2022
    September 2021
    August 2021
    July 2021
    June 2021
    May 2021
    November 2020
    September 2020
    July 2020
    April 2020
    March 2020
    February 2020
    January 2020
    December 2019
    October 2019
    September 2019
    August 2019
    July 2019
    June 2019
    May 2019
    April 2019
    March 2019
    February 2019
    January 2019
    December 2018
    November 2018
    October 2018
    September 2018
    August 2018

    Categories

    All
    45
    Acorn
    Acrylic
    Adults
    Altered
    Altered Book
    Animal
    Anniversary
    Apple
    Art
    Artificial
    Autumn
    Bag
    Banner
    Beach
    Beads
    Bike
    Black
    Blackbird
    Blog
    Bohemian
    Book
    Book Pages
    Bow
    Box
    Butterflies
    Buttons
    Can
    Candle
    Cardboard
    Cards
    Cat
    Change
    Christmas
    Clipboard
    Clothespin
    Clover
    Coasters
    Coffee Can
    Cold
    Cookie Sheet
    Cork
    Corks
    Coronavirus
    Craft
    Crafts
    Creepy
    CriCut
    Crow
    Daisy
    Decal
    Decor
    Decorate
    Decoration
    Decorations
    Decoupage
    Dictionary
    Diy
    Dog
    Dream Catcher
    Dreams
    Embellishment
    Embellishments
    Etching Cream
    Fabric
    Fabric Paint
    Fairy
    Fake Flowers
    Fall
    Feather
    Floral
    Flower
    Flowers
    Fluff
    Frame
    Fringe
    Future
    Galaxy
    Game
    Garland
    Gift
    Glitter
    Glow
    Glue
    Gnome
    Gold
    Grass
    Grow
    Halloween
    Handmade
    Hanging
    Harry Potter
    Hat
    Hippie
    Holiday
    Hot Glue
    Iron
    Jar
    Jean
    Jeans
    Jewelry
    Jewels
    Journal
    Junk
    Keepsake
    Keys
    Kids
    Knob
    Lantern
    Librarian
    Life
    Lights
    Light Up
    Luminary
    Magnets
    Mason Jar
    Matt
    Memo
    Memories
    Mermaid
    Mini
    Mirror
    ModPodge
    Mod Podge
    Moon
    Moss
    Music
    Native American
    Netting
    Nightlight
    Notes
    Ollivander's
    Ornament
    Outdoor
    Paint
    Paper
    Party
    Peanut Butter
    Pet Portrait
    Photo
    Pieces
    Pine
    Pins
    Pointsettia
    Pom Pom
    Pop
    Portrait
    Postcard
    Post It
    Posts
    Pumpkin
    Quick
    Quote
    Raven
    Realistic
    Record
    Recycled
    Repurposed
    Reuse
    Reused
    Ribbon
    Rice
    Runner
    Scrap
    Scrapbook
    Scraps
    Seashells
    Seeds
    Seniors
    Sheet Music
    Sheets
    Shirt
    Sleep
    Slice
    Small
    Smash Book
    Snow
    Snowman
    Sock
    Soul
    Soup
    Space
    Sparkly
    Spell Book
    Spells
    Splatter
    Spooky
    Starfish
    Stars
    Stencil
    Sticker
    Stickers
    Stitch
    Strawberry
    Stuffing
    Summer
    Surprise
    Tea
    Tealight
    Template
    Thread
    Thrift Store
    Tin Can
    Toole
    Tophat
    Tote
    Towel
    Tree
    Trinket
    Tshirt
    Twine
    Upcycled
    Update
    Vase
    Velvet
    Vino
    Vintage
    Vinyl
    Wand
    Wedding
    Wildflowers
    Wine
    Winter
    Wood
    Wreath
    Yarn

    RSS Feed

Proudly powered by Weebly
  • Home
  • About
  • Artwork
    • Book Page Art
    • Custom Portraits
  • Find Me
  • Order
  • Classes