
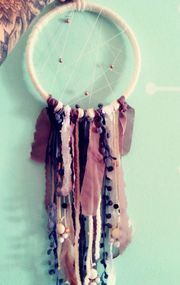
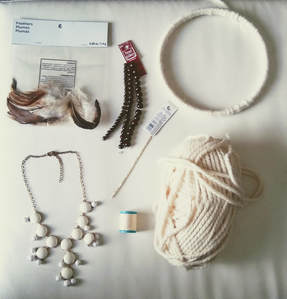
 I have always loved dream catchers. I once had this mega one that was so awesome in my tye-dye pre-teen bedroom! I have had others throughout the years and have made a variety for programs or just for fun. The one I show here I made for my grandma who was suddenly having a ton of bad dreams that were keeping her up throughout the night. The same night after hanging the dream catcher up above her bed she had a much more positive dream rather than something scary and morbid. Hopefully your dream catcher can provide you some relief as well or just be an eye-catching decoration. Supplies Needed:
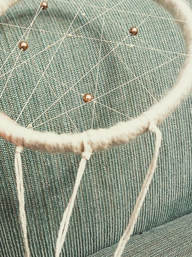
 1. Start by tying an end of your material to the hoop securely. Then start wrapping your material around the hoop. This is where your first bout of patience will come in. Keep feeding your spool/skein in and out of the hoop until it is covered in its entirety. I think this took me a bout a half hour... 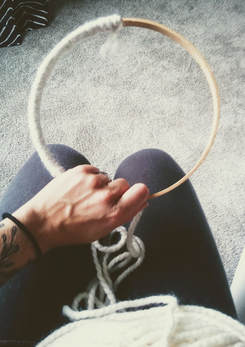 2. Finish it off by tying the end somehow to where you started.. I know, not the best description but that's all I got. I kind of looped mine around and tied it... and then tied again... and again. You definitely do not want it coming undone. (If you want extra security you could also glue the material as you wrap it) 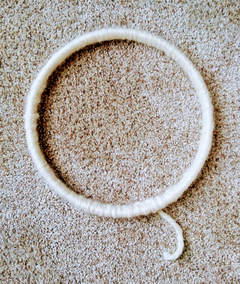 3. Here's where you want to add your webbing. If you don't want beads in your webbing then this is going to be super easy for you. However, If you do want beads, this will most-likely be a little more time consuming. a. Firstly, go ahead and act like you are forming your webbing so you can see how much of your yarn/thread you are going to use. Tie an end of the material you are using to the same area where you tied the yarn from step 2. Form the webbing by crossing back and forth from opposite ends of the hoop to start forming little triangular shapes. When you get to the amount you want, go ahead and cut the yarn so the rest of it doesn't get in your way and you can thread your beads on. b. If you are not using beads, you can just tie the webbing off wherever you started and you're ready to move on to step 4. If you are adding beads however, this is where patience round 2 appears. For the beads I used, the holes were much larger than the thread I was using and I knew they would not stay in place once they were strung on the web. So, to get around this, I tied little knots before and after each individual bead so that they would not move. Fun right? This took forever but I wanted the beads on there. I tied them on at random and started wrapping the webbing again until I was happy with where everything ended up and tied it off at the end. 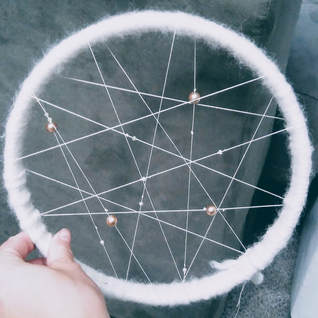 4. Now it's time to add the hanging components which, to me, is the fun part because I like to add "different" things to spruce it up/make it more interesting. You can add just about anything: ribbon, leather, feather, yarn, twine, jewelry pieces, beads, lace, etc. etc. a. Tie these pieces by using a larks head knot (this is how I always tie items on a dream catcher because you get two strings for the price of 1!) Just keep adding more and more of whatever you wish, tying in the same way. The more you add, the more texture/depth the dream catcher will have! 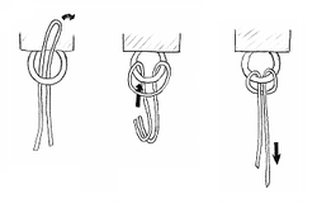 b. Once you get your strings/ribbons tied on you can then add beads, feathers, and other embellishments. Sometimes you have to finagle these items on and tie them in weird/random ways to make them work!
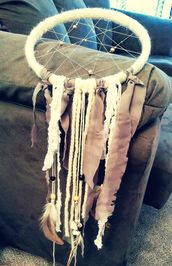
c. Keep adding and adding until you are happy with the amount of embellishments. You can see in the below image a better view of the items I added. The cream-colored charm pieces were from a broken necklace so they made for a perfect free addition! 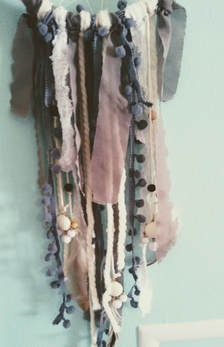 5. Lastly, if desired, add a hoop for hanging by doing another larks head knot and tying it off. This can now easily be hung on a nail head or hook. You can also leave it without this, as the hoop itself can also rest on a nail head on its own, it is up to you! 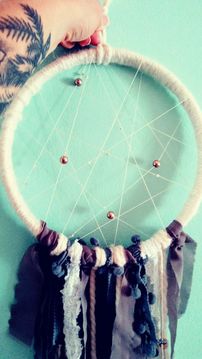 6. Hang your dream catcher up above your bed for a restful night's sleep!
Or use it to decorate just about any room of your home! Enjoy!
1 Comment
|

Rebecca MyersHey there, I'm Becca, or Rebecca, but not Becky, never Becky, unless you're my family from down south! I'm a simply modern librarian by day and an artist by night. My pursuit is for a simple, happy, healthy, and more fulfilling life! I hope I inspire you to get crafty! Archives
March 2022
Categories
All
|
 RSS Feed